The Program Creation Wizard
The Program Creation Wizard is the primary tool for building program templates in RABS. A program template defines what normally happens — the recurring shape of a service, activity, or outing — and the wizard walks you through every dimension of that shape: schedule, participants, billing, staffing, vehicles, and notes.
Once finalised, the template feeds the Loom, which weaves it into date-specific instances across the active window.
Accessing the Wizard
Open the wizard from the Programs section of the admin panel. You will land on the Drafts screen, which lists all in-progress drafts.
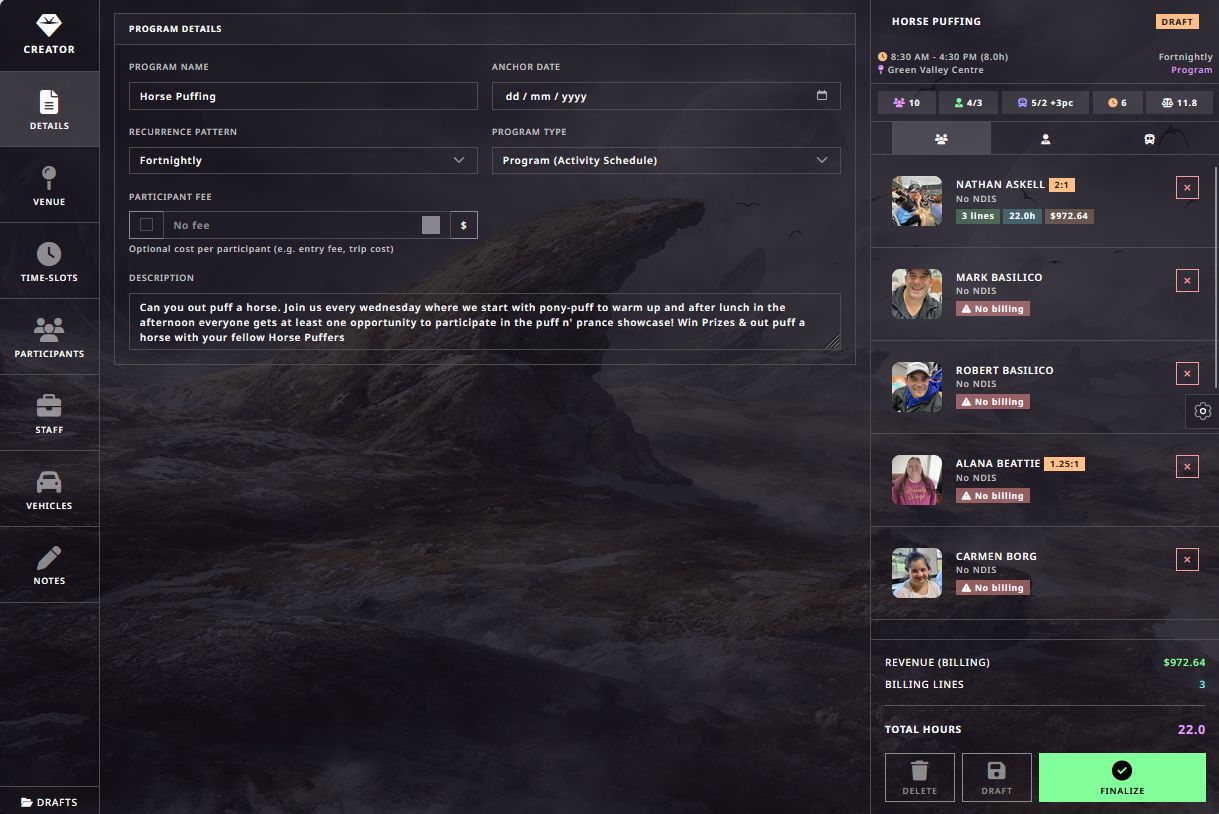
From here you can:
- Resume an existing draft by clicking its row
- Create a new program by clicking the create button
- Delete drafts you no longer need
Drafts are saved automatically as you work through each step, so you can leave and return at any time without losing progress.
Wizard Navigation
The left sidebar provides direct access to every section of the wizard. You can jump between sections in any order — the wizard is non-linear.
| Icon | Section | Purpose |
|---|---|---|
| Creator | Top-level wizard view | Overview and draft management |
| Details | Program identity | Name, schedule, type, fees, description |
| Venue | Location | Where the program runs |
| Time-Slots | Daily structure | Pickup, activities, meals, drop-off blocks |
| Participants | Enrolment & billing | Who attends and how they are billed |
| Staff | Rostering | Shift assignments and ratios |
| Vehicles | Transport | Fleet and personal car allocation |
| Notes | Staff notes | Persistent notes included on every instance card |
The bottom-left Drafts button returns you to the drafts list at any time.
Step 1 — Program Details
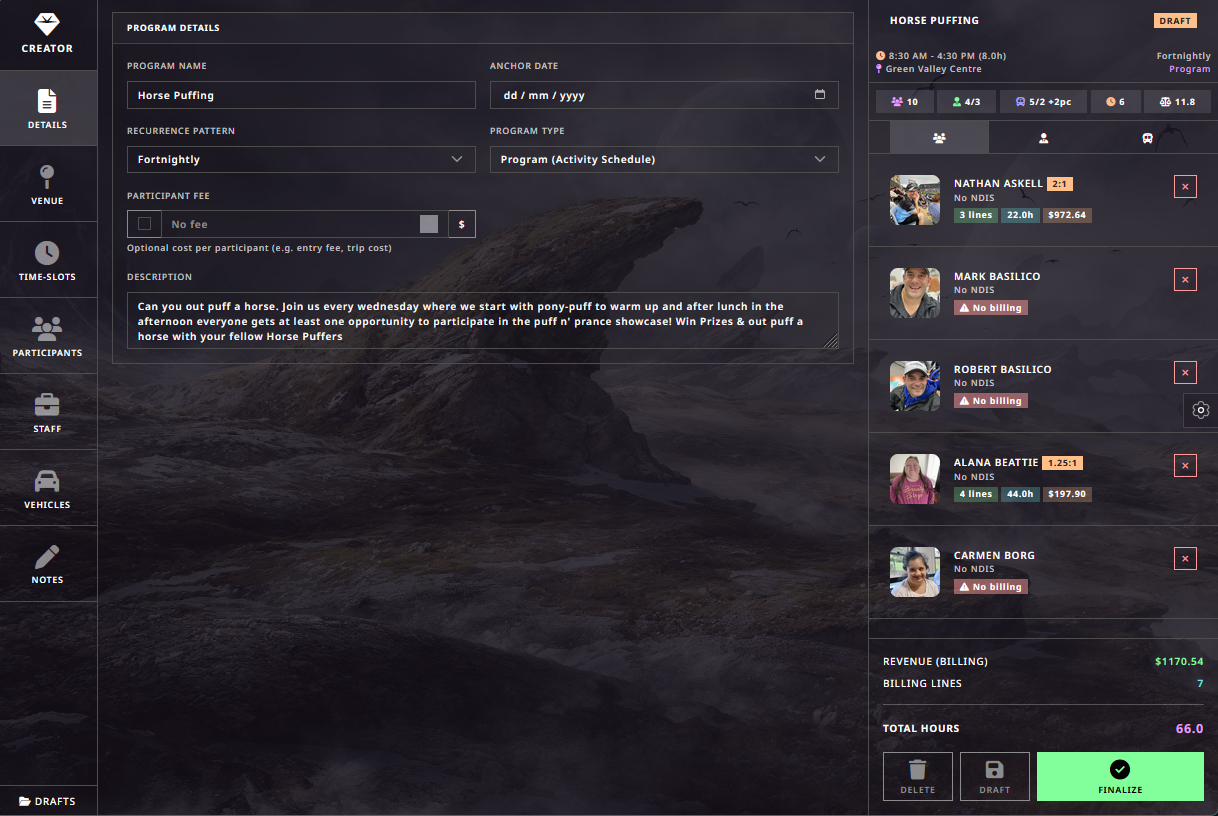
This is where you define the identity and schedule of the program.
Fields
| Field | Description |
|---|---|
| Program Name | The display name used everywhere in RABS (e.g. "Horse Puffing") |
| Anchor Date | The first occurrence date — the Loom counts forward from here using the recurrence pattern |
| Recurrence Pattern | How often the program repeats: Weekly, Fortnightly, Monthly, or custom |
| Program Type | The operational category — e.g. "Program (Activity Schedule)", "Transport Only", "SIL" |
| Participant Fee | Optional per-participant cost (entry fees, trip costs). Toggle on and enter a dollar amount |
| Description | Free-text description of the program, visible to coordinators and used by Reggie for context |
Tips
- The Anchor Date matters. If you set a fortnightly program anchored to a Wednesday, it will repeat every second Wednesday from that date forward.
- Program Type determines which billing codes are available later in the Participants step and how the Loom handles instance generation.
- The Description is not just for humans — Reggie reads it when interpreting communications about this program.
Step 2 — Venue
Select or create the venue where this program takes place. The venue is pulled from the Sources filing cabinet (the core_source schema) and determines the location shown on instance cards, transport routing, and compliance checks.
Step 3 — Time Slots
Time slots define the internal structure of the program day. Each slot is a named block of time that can be one of four types:
| Slot Type | Purpose |
|---|---|
| Pickup | Transport collection window |
| Activity | The core program activity |
| Meal | Break / meal period |
| Drop-off | Transport return window |
How It Works
- Click any slot to edit its start/end times
- Slots are ordered chronologically and displayed as a timeline
- The total program duration (shown in the right sidebar header, e.g. "8:30 AM – 4:30 PM (8.0h)") is derived from the earliest pickup to the latest drop-off
- Time slots flow directly into instance timeslot cards when the Loom weaves instances
Example
A typical community access day might have:
07:30 – 08:30   Pickup
08:30 – 12:00   Morning Activity
12:00 – 12:45   Lunch
12:45 – 15:30   Afternoon Activity
15:30 – 16:30   Drop-off
Step 4 — Participants
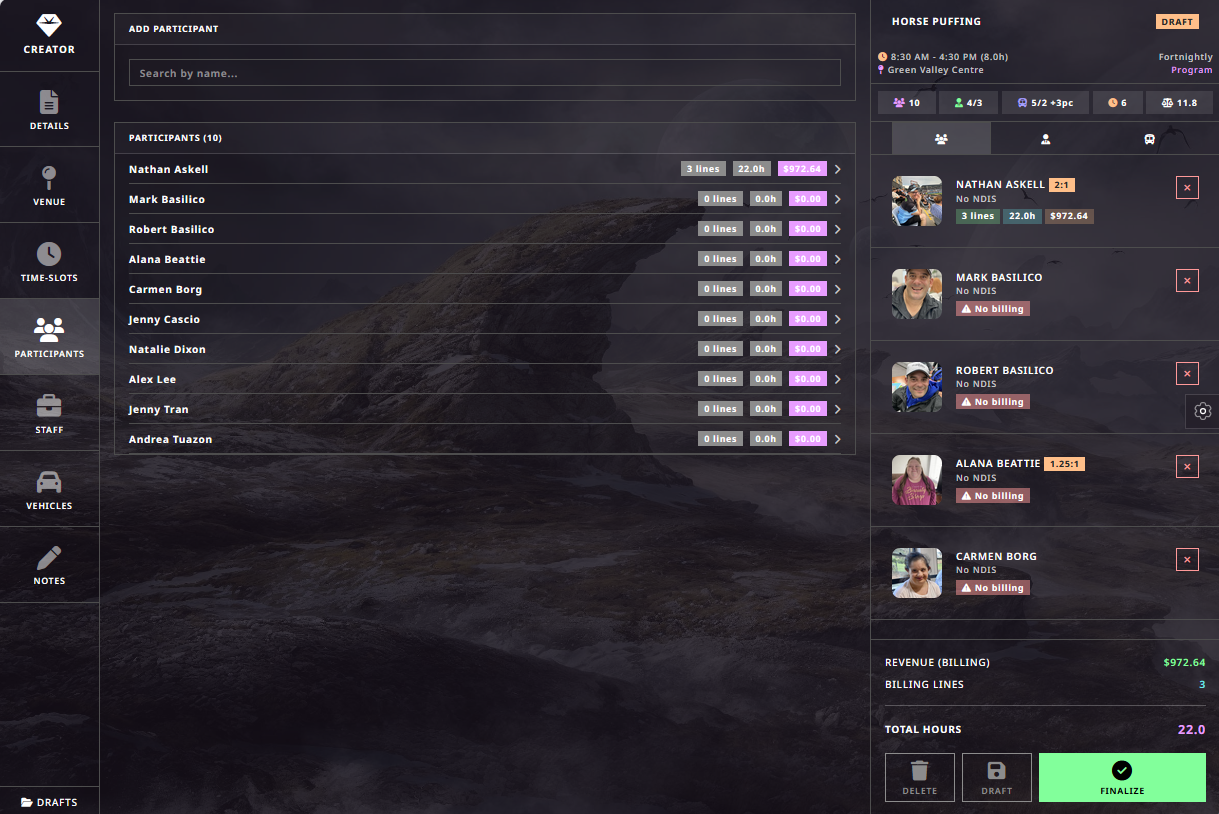
This is the most complex step. It handles participant enrolment, address configuration, and per-participant billing — all in one view.
Adding Participants
Use the Search by name field at the top or the Add Participant button to enrol participants. The participant list shows each person with summary badges:
- Lines — number of billing lines configured
- Hours — total billable hours
- Dollar amount — total billing value (highlighted in green)
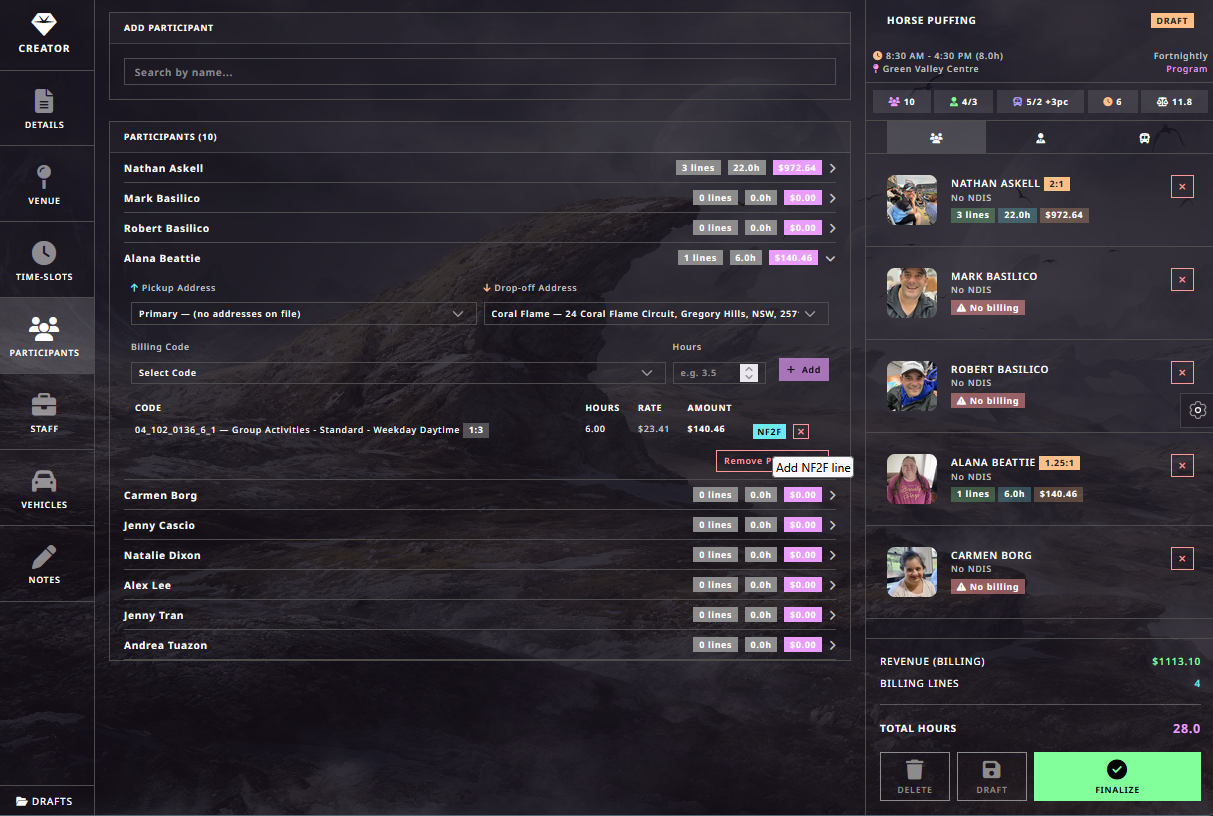
Click the chevron on any participant row to expand their billing configuration.
Address Configuration
Each participant can have:
- Pickup Address — where transport collects them (defaults to "Primary" from their file, or "(no addresses on file)" if none recorded)
- Drop-off Address — where transport returns them (can differ from pickup)
Addresses pull from the participant's source record and can be overridden per-program.
Billing Lines
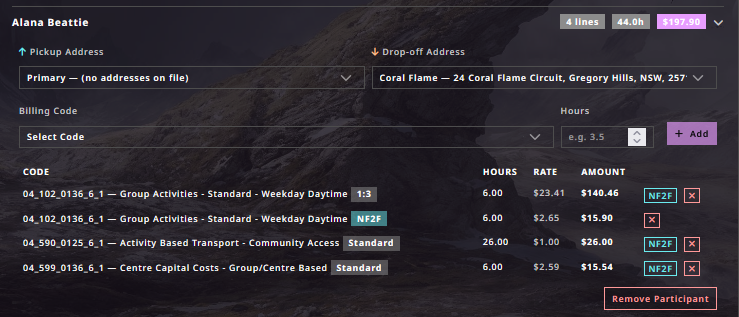
Each participant can have multiple billing lines. A billing line consists of:
| Field | Description |
|---|---|
| Billing Code | NDIS line item code selected from a dropdown (e.g. 04_102_0136_6_1) |
| Description | Auto-populated from the code (e.g. "Group Activities - Standard - Weekday Daytime") |
| Ratio Badge | The support ratio this line uses (e.g. 1:3) |
| Hours | Number of hours to bill |
| Rate | Dollar rate per hour |
| Amount | Calculated total (Hours x Rate) |
| Type Badge | Either NF2F (Non-Face-to-Face) or Standard |
Adding NF2F Lines
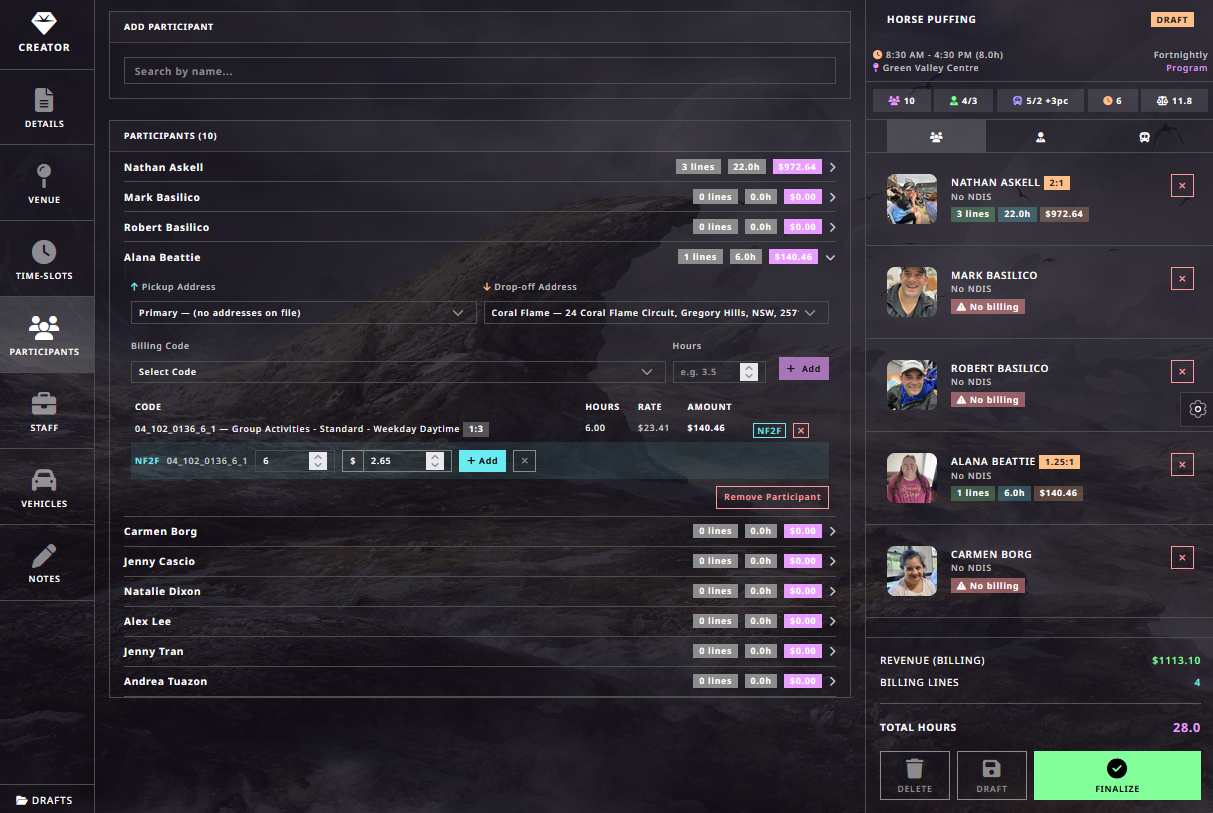
To add a Non-Face-to-Face billing line:
- Click Add NF2F line (or use the NF2F button on an existing line)
- The NF2F variant of the billing code is created automatically
- Enter the NF2F hours and dollar amount
- NF2F lines appear with a distinctive
NF2Fbadge
NF2F billing covers indirect support work — planning, reporting, coordination — that does not involve direct contact with the participant.
Billing Example
A single participant (Alana Beattie) might have four billing lines:
| Code | Type | Hours | Rate | Amount |
|---|---|---|---|---|
| 04_102_0136_6_1 — Group Activities Standard | 1:3 | 6.00 | $23.41 | $140.46 |
| 04_102_0136_6_1 — Group Activities NF2F | NF2F | 6.00 | $2.65 | $15.90 |
| 04_590_0125_6_1 — Activity Based Transport | Standard | 26.00 | $1.00 | $26.00 |
| 04_599_0136_6_1 — Centre Capital Costs | Standard | 6.00 | $2.59 | $15.54 |
Total: 4 lines, 44.0h, $197.90
The Right Sidebar
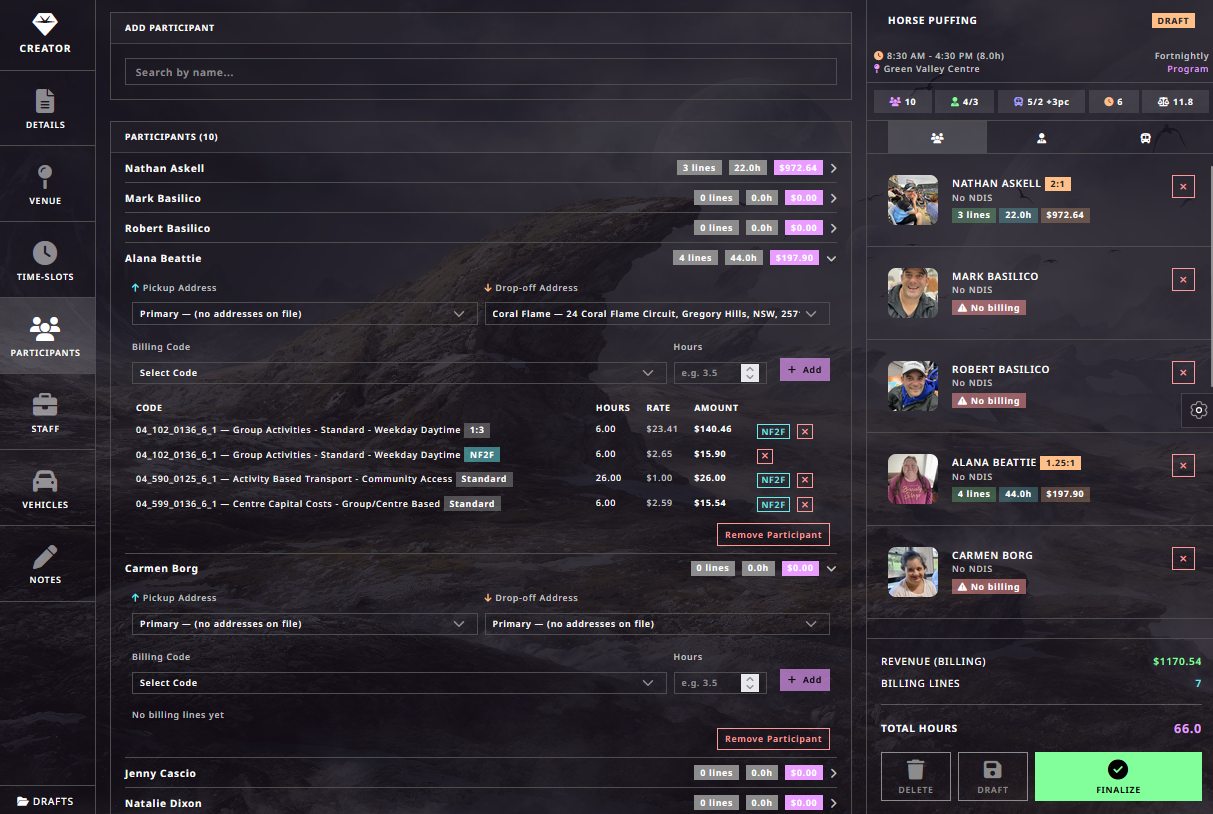
The right sidebar provides a live summary that updates as you configure billing:
- Participant cards with profile photos, NDIS status, billing line counts, hours, and amounts
- Revenue (Billing) — total projected revenue across all participants
- Billing Lines — total number of billing lines
- Total Hours — aggregate billable hours
- Participants with no billing configured show an amber "No billing" warning badge
The sidebar has three tabs (icons at the top): participants view, staff view, and vehicles view — letting you cross-reference without leaving the current step.
Step 5 — Staff
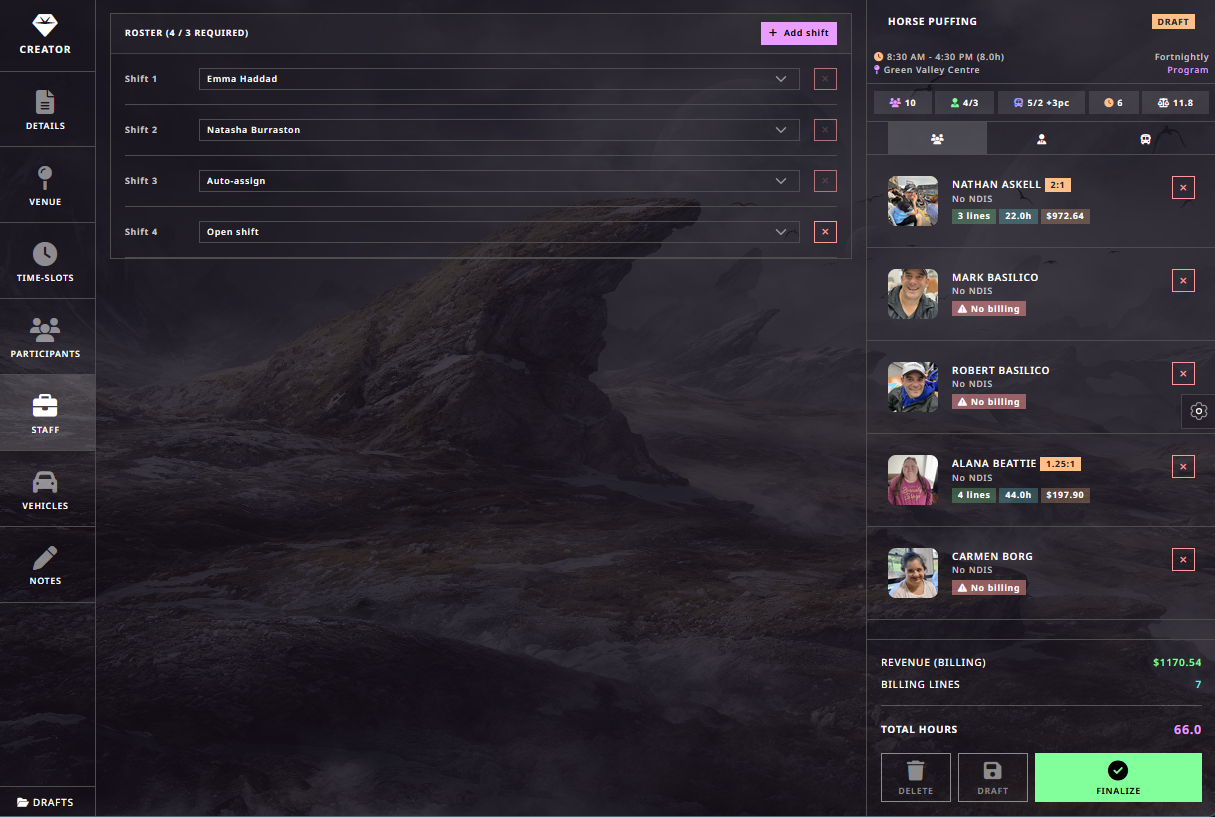
The Staff step manages shift rostering. The header shows the current state: ROSTER (4 / 3 REQUIRED) — meaning 4 shifts are configured against a minimum requirement of 3.
Shift Types
Each shift slot can be one of three modes:
| Mode | Description |
|---|---|
| Named staff | A specific person is assigned (e.g. "Emma Haddad", "Natasha Burraston") |
| Auto-assign | The Loom will automatically fill this shift based on availability, qualifications, and preferences |
| Open shift | Published as available — staff can claim it, or a coordinator can assign it later |
How It Works
- Click + Add shift to create a new shift slot
- Use the dropdown to select a specific staff member or choose Auto-assign / Open shift
- Remove a shift with the x button
- The required minimum is calculated from participant ratios (configured in the next step or derived from billing codes)
Ratio Awareness
The "3 REQUIRED" figure comes from the participant-to-staff ratios defined by the billing codes. If you have 10 participants with 1:3 ratio billing, the system knows you need at least 4 staff (rounded up). The wizard surfaces this so you can see at a glance whether you are understaffed.
Step 6 — Vehicles
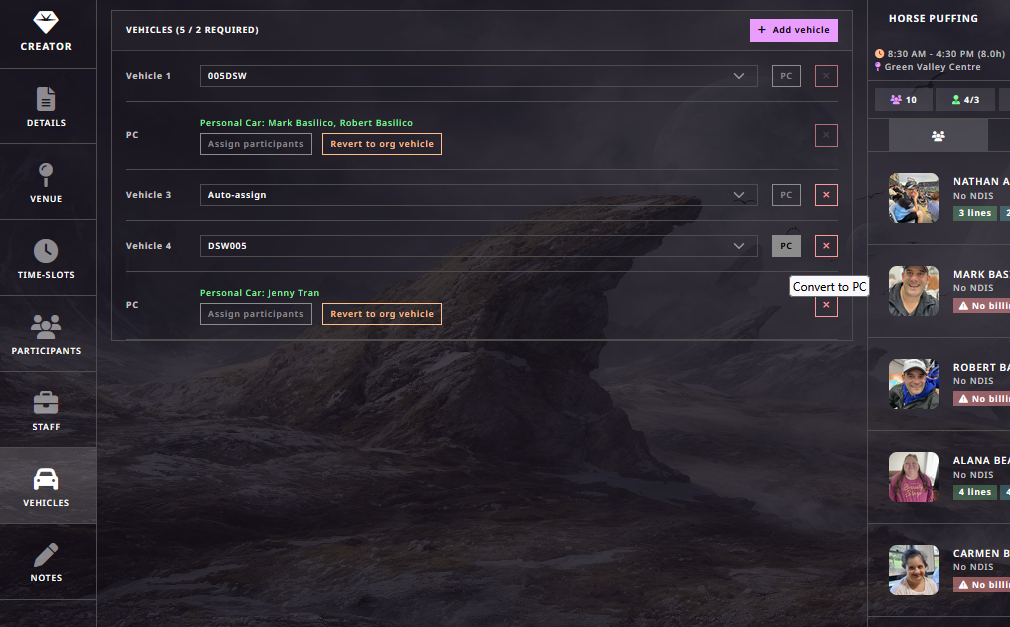
The Vehicles step manages transport allocation. The header shows: VEHICLES (5 / 2 REQUIRED) — 5 vehicle slots against a minimum of 2.
Vehicle Types
| Type | Description |
|---|---|
| Organisation vehicle | A fleet vehicle selected by registration/ID (e.g. "005DSW", "DSW005") |
| Personal Car (PC) | A staff member or participant uses their own vehicle |
| Auto-assign | The Loom selects an available vehicle automatically |
Personal Car Workflow
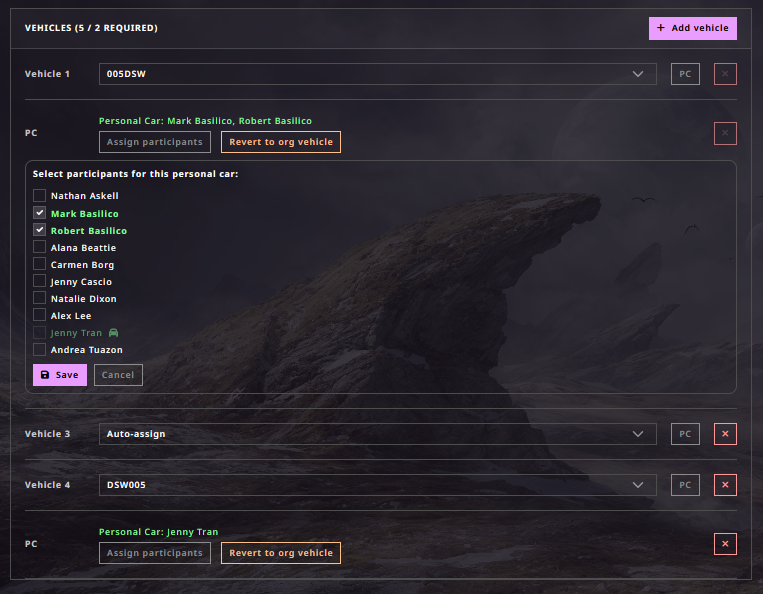
When a vehicle is converted to a Personal Car:
- The PC button toggles the vehicle to personal car mode
- A label appears showing who drives it: "Personal Car: Mark Basilico, Robert Basilico"
- Click Assign participants to open a checkbox popup listing all enrolled participants
- Tick the participants who will travel in this car
- Greyed-out participants (e.g. "Jenny Tran" with a lock icon) are already assigned to another personal car
- Click Save to confirm the assignment
- Use Revert to org vehicle to switch back to a fleet vehicle
Converting Between Types
- Convert to PC — tooltip button that switches an organisation vehicle to personal car mode
- Revert to org vehicle — switches a personal car back to an organisation vehicle slot
Sidebar Vehicle View
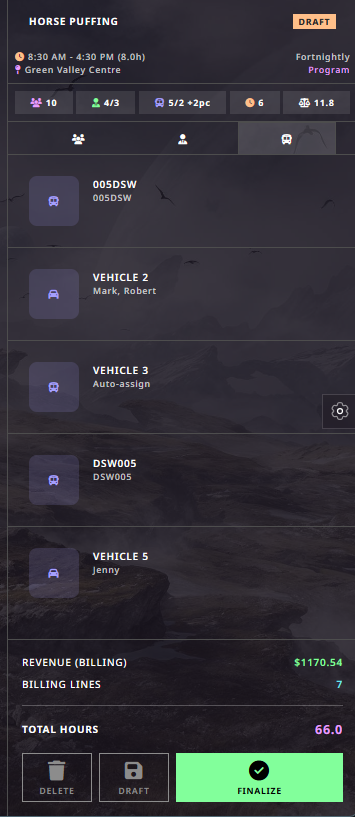
Switch to the vehicles tab in the right sidebar to see all vehicles with their assigned passengers at a glance. Each card shows:
- Vehicle name/registration
- Assigned participant names
- Auto-assign status where applicable
Step 7 — Notes
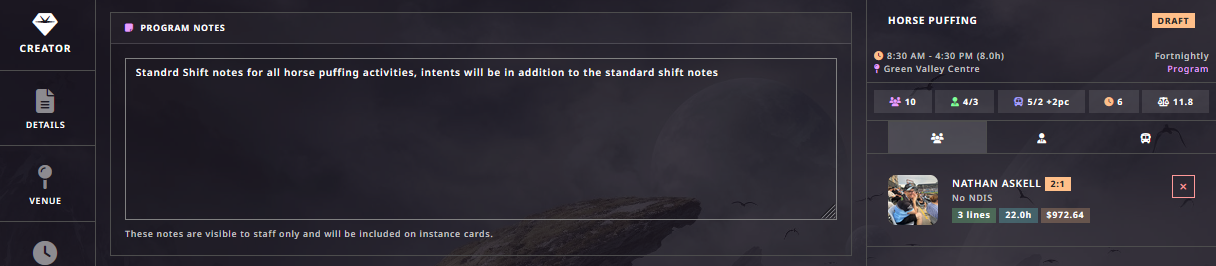
The Notes step provides a free-text area for program-level shift notes. These notes:
- Are visible to staff only
- Are included on every instance card generated from this template
- Persist across all future instances until modified
Use this for standing instructions, safety reminders, or operational context that staff need on every occurrence of the program.
Example
"Standard shift notes for all horse puffing activities, intents will be in addition to the standard shift notes."
Instance-specific notes (intents) can be added separately through the calendar system and will appear alongside these template-level notes.
The Summary Sidebar
The right sidebar is visible throughout the entire wizard and provides a running summary of the program as you build it.
Header
- Program name and draft status badge
- Schedule: time range and duration (e.g. "8:30 AM – 4:30 PM (8.0h)")
- Venue: location name
- Recurrence: pattern label (e.g. "Fortnightly Program")
Quick Stats Bar
A row of compact badges summarising key metrics:
| Badge | Meaning |
|---|---|
| Participants icon + count | Total enrolled participants (e.g. 10) |
| Staff icon + ratio | Staff count / required (e.g. 4/3) |
| Vehicle icon + info | Vehicle count + personal cars (e.g. 5/2 +2pc) |
| Dot + count | Billing lines or other metric |
| Clock + hours | Total ratio hours (e.g. 11.8) |
Tabbed Views
Three tabs let you switch the sidebar content:
- Participants — photo cards with NDIS status, billing line counts, hours, and dollar amounts
- Staff — assigned shifts and roles
- Vehicles — fleet and personal car assignments with passenger lists
Footer
- Revenue (Billing) — total projected billing value
- Billing Lines — count of all billing lines across all participants
- Total Hours — aggregate hours
- Action buttons: Delete, Draft (save and exit), Finalize
Finalising a Program
When all sections are configured, click the green Finalize button in the bottom-right corner.
Finalising:
- Validates all required fields and ratios
- Converts the draft into a live program template
- Makes the template available to the Loom for instance generation
- The Loom immediately begins weaving instances across the active window
Once finalised, the program appears in the main programs list and its instances populate the operational calendar. Changes can still be made to the template — the Loom reweaves affected instances automatically.
Draft vs Finalize
| Action | Effect |
|---|---|
| Draft | Saves current state. Program is not live. No instances are generated. You can return later. |
| Finalize | Program goes live. The Loom weaves instances. Billing, rostering, and transport are activated. |
| Delete | Permanently removes the draft. Cannot be undone. |
Relationship to Other Concepts
The Program Creation Wizard builds Templates — the first of the four primitives described in Workshed + Loom = Magic:
- Templates (what the wizard creates) define what normally happens
- Intents (calendar entries) modify specific dates without changing the template
- Sources (participants, staff, vehicles) are the assets selected during the wizard
- Instances (Loom output) are the dated projections the Loom weaves from your template
The wizard is where operational intent takes shape. Everything downstream — the Loom, the Ribbon, billing, rostering, transport, and Reggie's intelligence — depends on the quality and completeness of what you build here.
For the technical schema behind these concepts, see Core Engine Schema.